Adding content
Using the GitHub editor
You can modify and change the mardown and configuration files in whatever way you are used to. However, if you’re not familiar with git, you can use the GitHub editor to make changes to the content.
First, you will need to be able to edit this repository. Ask for permissions at the repository admins.
The content is written in markdown, see tutorial for reference, and can be edited directly in the browser by following these steps:
- navigating to your chapter at
docs/chapters/at the top of this page - clicking on your chapter’s md file (e.g.
chapter_10.md) - clicking on the edit buttion:
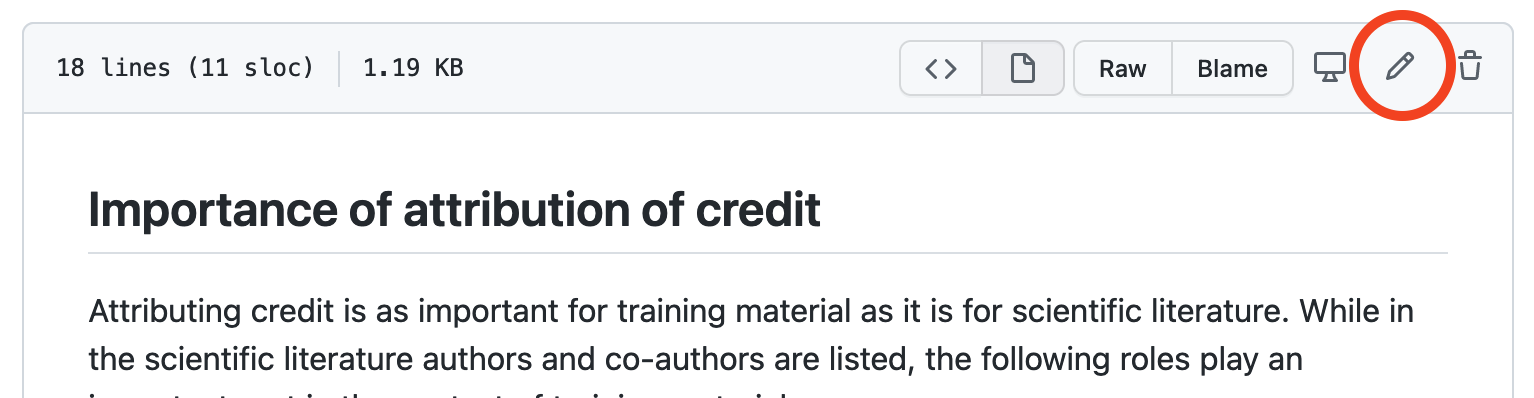
you can edit the markdown in the <> Edit file tab

and review your changes by clicking the preview tab.

- When you have finished, you can directly commit to the main branch. In order to do that, write a commit message that briefly describes your changes, and click the green button with Commit changes:
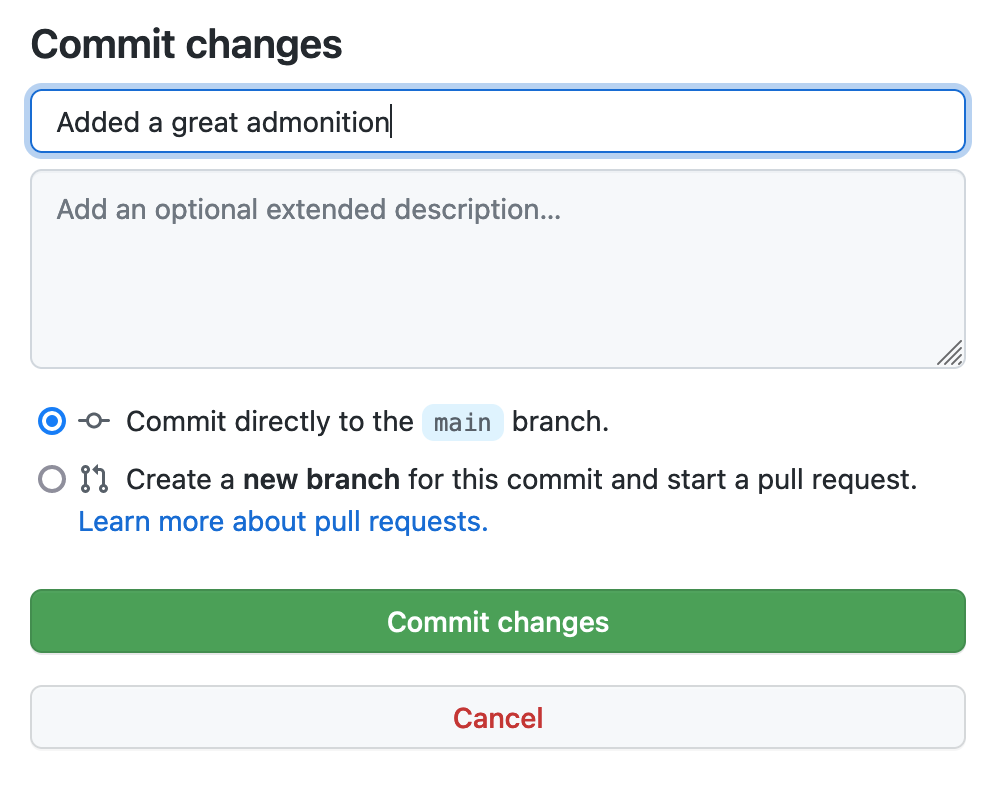
After commiting it will take ~30-60 seconds before the website is updated with your changes. The website URL can be found to the right on the first page of the repository.
Adding specific elements
In addition to adding text and other content in markdown, this template is based on the theme material which has many fancy extensions, like admonitions that can be used as well.
Author cards
You can add the authors as ‘cards’ to the index.md file
In order to do this add a placeholder chunk in squared brackets [] to the index.md file like this:
[cards class_name="authors" cols="3"(docs/assets/cards/author_cards.yaml)]
This will render the author cards in a grid with 3 columns. You can change the number of columns by changing the
colsparameter between 1 and 6.
The authors are defined in a the author_cards.yaml file in the docs/assets/cards folder. The yaml file should look like this:
- title: Zeus
  content: |
    [:custom-orcid:](https://orcid.org/) [:simple-github:](https://github.com/) [:material-linkedin:](https://linkedin.com/)<br>
    Lorem ipsum dolor sit amet.
  image: ./assets/images/cards/001-zeus.png

- title: Athena
  content: |
    [:custom-orcid:](https://orcid.org/) [:simple-github:](https://github.com/) [:material-linkedin:](https://linkedin.com/)<br>
    Lorem ipsum dolor sit amet.
  image: ./assets/images/cards/003-athena.png

- title: Poseidon
  content: |
    [:custom-orcid:](https://orcid.org/) [:simple-github:](https://github.com/) [:material-linkedin:](https://linkedin.com/)<br>
    Lorem ipsum dolor sit amet.
  image: ./assets/images/cards/007-poseidon.png
Also remember to add authors to the .zenodo.json and CITATION.CFF files in the root of the repository.
Boxed sections
If you want to highlight some information you can make use of admonitions.
Create a box by adding three exclamation marks !!! followed by the keyword info followed by the desiered title inside quotation marks "Title". The content of the block follows on the next line, indented by four spaces:
!!! info "Information"
    This box contains important information
Information
This box contains important information
Boxed sections are also used for creating Exercises.
Code blocks
To call out a command or code within a sentence, use single backticks around the code.
To create a new line in the document press `Enter`.
Enter
To display example code into its own distinct block, use triple backticks ```
  ```
  this is a basic code block example
  consisting of
  3 rows
  ```
Contributor cards
Contributor cards can be added to the index.md file in a similar way as author cards. But is defined in a separate file contributor_cards.yaml in the docs/assets/cards folder.
The placeholder chnk for the contributor cards should look like this:
[cards class_name="contributors" cols="6"(./docs/assets/cards/contributor_cards.yaml)]
Also remember to add contributors to the .zenodo.json and CITATION.CFF files in the root of the repository.
Exercises
In order to highlight exercises with expandable solutions you can make use of nested boxed sections.
!!! example "Exercise"
    This is a question

    ??? success "Solution"
        this is the solution to the question
Exercise
This is a question
Solution
this is the solution to the question
Headings
In markdown, headings are created by adding one to six # followed by a space before your heading text. The number of # will indicate the level of the heading. The more you add, the smaller the heading will be.
To create a heading, add one to six # symbols before your heading text. The number of # you use will determine the size of the heading.
# This is a heading 1
### This is a heading 3
Images
If you want to add an image, the best way would be to use html, e.g:
```html
<figure>
<img src="https://elixir-europe.org/sites/default/files/ebif_news_release_image_news_landingpageimage_.png" width="600" alt="Image on elixir landing page"/>
<figcaption> Elixir image </figcaption>
</figure>
```
Which would result in:

If you want to use local images, add them to docs/assets/images and refer to them in the html as a relative path, e.g.:
```html
<figure>
<img src="../../assets/images/elixir_image.png" width="600" alt="Image on elixir landing page"/>
<figcaption> Elixir image </figcaption>
</figure>
```
Resulting in:

Links
Inline links are created by wrapping link text in brackets [ ], and then wrapping the URL in parentheses ( ) like this:
This lesson template was built for [ELIXIR](https://elixir-europe.org/).
This lesson template was built for ELIXIR
Linking to other pages follows the same prinicple but intstead of an URL, the relative path can be used, ie [Chapter 1](/../../chapters/chapter_01) Chapter 1.
Lists
You can make an unordered list by preceding one or more lines of text with -, *, or +. You will need to use the same
- George Washington
* John Adams
+ Thomas Jefferson
- George Washington
- John adams
- Thomas Jefferson
To order your list, precede each line with a number.
1. James Madison
2. James Monroe
3. John Quincy Adams
- James Madison
- James Monroe
- John Quincy Adams
You can create a nested list by indenting one or more list items below another item.
Type space characters in front of your nested list item, until the list marker character - or * lies directly below the first character of the text in the item above it.
1. First list item
   - First nested list item
     - Second nested list item
References
This website supports bibtex (pandoc style) by using the bibtex plugin. In order to add a reference, add it in bibtex format to references.bib located in the main directory, cite it in your markdown document with `` and cite 1 like this:
Tables
Tables are created with pipes | and hyphens -. Hyphens are used to create each column’s header, while pipes separate each column. You must include a blank line before your table in order for it to correctly render. If you want to build large tables, have a look at markdown tables generator.
---
| start     | end       | topic     |
|-------    |-------    |---------  |
| 10:00     | 10:30     | coffee!   |
| 12:00     | 13:00     | lunch!    |
---
| start | end | topic |
|---|---|---|
| 10:00 | 10:30 | coffee! |
| 12:00 | 13:00 | lunch! |
Videos
You can also embed videos from a local source (with a relative path) or from an url (like youtube). To use a youtube URL,
just attach the ID of the video to a youtube embedded video link: https://youtube.com/embed/. For example, the Elixir training video https://youtu.be/oAD8FdGf8tI has the ID oAD8FdGf8tI, so the final link would be:

Adding additional content
For more advanced functionality, visit the mkdocs material webpage. For example for information on how to display admonitions.
-
Nancy J Hoebelheinrich, Katarzyna Biernacka, Michelle Brazas, Leyla Jael Castro, Nicola Fiore, Margareta Hellstrom, Emma Lazzeri, Ellen Leenarts, Paula Maria Martinez Lavanchy, Elizabeth Newbold, Amy Nurnberger, Esther Plomp, Lucia Vaira, Celia W G van Gelder, and Angus Whyte. Recommendations for a minimal metadata set to aid harmonised discovery of learning resources. June 2022. URL: https://doi.org/10.15497/RDA00073, doi:10.15497/RDA00073. ↩