Practicals
Introduction
This course consists of multiple practicals. During the four days we will go through practical 0 till 6 (more info in the schedule). Each practical has a dedicated directory in the repository, and comes with:
- A container image: you will receive a link for each practical to your personal environment during the course.
- One or more notebooks with the name
p[practical number]_topic.ipynb. So for practical 1, we have a notebook calledp1_segmentation.ipynb. - One or more conda environments in the image corresponding to each notebook, e.g.
p1_segmentation.ipynb.
Working on the practicals
To start working on the practicals, navigate to the provided spreadsheet with server login information, click on the link next to your name that links to the corresponding practical. Then, use the password associated with your name to log in.
Now you are in your personal container image. This image has two important directories that are mounted to all container images that are avaiable to you:
- (for jupyter-based practicals)
/home/jovyan/workdir: a directory in home for which you have read and write access. This is where you will be mainly working in. For the rstudio-based practical this is/home/rstudio. /data: a directory where you only have read access. From here you can read the available input data.
At the first login, open a terminal, navigate to /home/jovyan/workdir and clone the repository:
git clone https://github.com/elixir-europe-training/ELIXIR-SCO-spatial-omics.gitFor jupyter containers, only /home/jovyan/workdir is shared with other containers. This means that everything you write outside this directory will not be available for other practicals.
If you are comfortable with using git, you migh want to fork the repository first, and push your changes to your own namespace. In order to do so:
- Fork the repository (Click ‘fork’ on the top right).
- Set your name and e-mail with:
git config --local user.email "you@example.com"
git config --local user.name "Your Name" - Clone the repository from your namespace to
/home/jovyan/workdir - Make changes and push them. You will be asked for your github username and password (use a token: https://github.com/settings/tokens/new). If you are using a token, store it somewhere, because you have to login again if you move to a container of another practical.
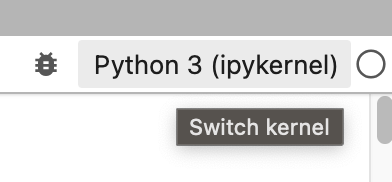
After cloning you can use the navigation menu to open a notebook. With each notebook, use the associated environment (has the same name as the notebook). Do this by clicking the button ‘Python 3 (ipykernel)’ on the top right of your notebook:

And select the environment with the corresponding name from the dropdown menu. This ensures that you are using the correct dependencies for each practical.
If you encounter any issues or have questions, please ask one of the instructors for assistance. Happy coding!
Working locally
If you would like to work on the exercises after course, you can work locally with docker and download the files from amazon s3.
On s3, there is a bucket in which we mirrored the /data folder. To download data from /data, you can use e.g. wget:
FILEPATH=/data/path/to/file.txt
wget https://elixir-sco-spatial-omics.s3.eu-central-1.amazonaws.com"$FILEPATH"
If you are used to AWS CLI, you can also download the full directories from the bucket elixir-sco-spatial-omics in region eu-central-1.
The container images for each practical are in the sibswiss namespace on dockerhub, find them here. In order to use them locally for e.g. practical 6, you can use the following command:
docker run \
--rm \
-p 8888:8888 \
-v $PWD:/home/jovyan/workdir \
-e JUPYTER_ENABLE_LAB=yes \
sibswiss/elixir-sco-spatial-omics:practical_6
Now, jupyter lab should be available from localhost:8888. Use the token that is provided in the terminal to login. Change the option -v to mount another local directory to the container, for example the directory in which you have stored the required input files.
For the rstudio image of practical 5, this would be:
docker run \
--rm \
-p 8787:8787 \
-v $PWD:/home/rstudio \
sibswiss/elixir-sco-spatial-omics:practical_5
Now Rstudio is available from localhost:8787. Use the username rstudio and the password that is provided in the terminal to login.
